 I love embellishments and little decorative details on fashions and that is why I love embroidery. I have a Bernina 200E/730 that I bought years ago and I still love this machine. It has the capability to do hundreds of decorative stitches and to do machine embroidery so I can create one of a kind fashions.
One year when I was at the Original Sewing and Quilt Expo in Atlanta I discovered this embroidery company that does their own designs, which have an Asian design flare and not a lot of stitches per inch so the embroideries come out light to the touch and not stiff, which makes their designs perfect for flowing fabrics, light weight fabrics and knits. Momo-Dini Embroidery Art is owned by two sisters, Momo and Dini, Fine Art Professors originally from China, they do their own artwork and sales and they have won many awards for their paintings and designs.
 I look forward to seeing Dini Yan at the Expo every year not only to see what new designs they have created but because she is so nice and friendly. This year I was really excited to be able to show her what I created with their embroidery designs.
One year they came out with these designs called Fashion Ladies and I immediately knew what I wanted to make to show off these designs. Unfortunately the design CD went into my “stash” like so many other fabrics and embroidery CDs do, but this year I made this skirt a priority on my sewing list. And I am so glad I did because it is beautiful and fun to wear. For some reason I feel like a little doll wearing it. It makes me happy.
One of the hardest things to find for this skirt was a pattern. The design cd has nine different fashion ladies, so I wanted a skirt with nine gores. Well that was impossible, I searched all the major pattern makers and even though I know how to make patterns, I really didn’t want to, so I finally decided on a dress pattern, McCall’s M6504, it has thirteen gores. 
 A few years ago I had made this pattern up in a Japanese cotton, I still had the muslin, so I knew that I could easily cut the bodice off of the dress pattern, make a few minor adjustments and I would have a perfect skirt pattern to spotlight these colorful Fashion Ladies.
I wanted a slight high waisted skirt so that I could wear a belt with it. To help me decide where to cut the bodice off, I put the dress on that I had previously made and measured from my shoulder down to where I wanted the skirt to sit at my waist, keeping the measuring tape going down from the shoulder following the princess seam line.
 I then took that measurement and transferred it to the dress pattern muslin. I measured down the seam and marked it, keeping in mind that I would need a waist seam allowance too.
 I transferred the new waist cutting line to all thirteen pattern pieces.
 Now I have a new skirt pattern.
Next was one of the fun parts, I would get to see these ladies come to life, by sewing the embroideries out. I always do a test of every embroidery I do. Yes, I know you think this is a waste of time, stabilizer, fabric, and thread, but it is NOT. By making a test of every embroidery, you are checking to see if there are any mistakes in the software, you are seeing if you like the colors that they have chosen or in my case, the colors I have chosen, you are actually seeing the actual size of the design, and you can use these test embroideries to help with your placement on your final fabric.
 Most embroidery CDs have instruction sheets or PDFs that you can print out. On the sheets they have suggested colors of threads that they chose for each design. I love colors so I personally like to choose my own color of threads and I always deviate from their suggestions. When I choose my colors I write the maker of the thread, the color name and/or color number on a sticky note and stick it to the instruction sheet. Sometimes I will put the date, or the name of the item I am making in case I want to replicate the same color design at another time.
 Instead of using a stabilizer I just used two layers of muslin. You can’t always go without stabilizer for your test embroideries, it depends on how heavy the stitches are or how many stitches per inch. Sometimes you need to make your test embroideries on the same type of fabric your fashion will be made out of, like if you were sewing on a knit it might sew out differently, or a chiffon, silk, etc. I was making my skirt out of linen so I knew the designs would sew out the same as on the muslin. I make notes on my test embroideries, like names, dates, reverse design, change color, etc. and write on them using a pen or sharpie.
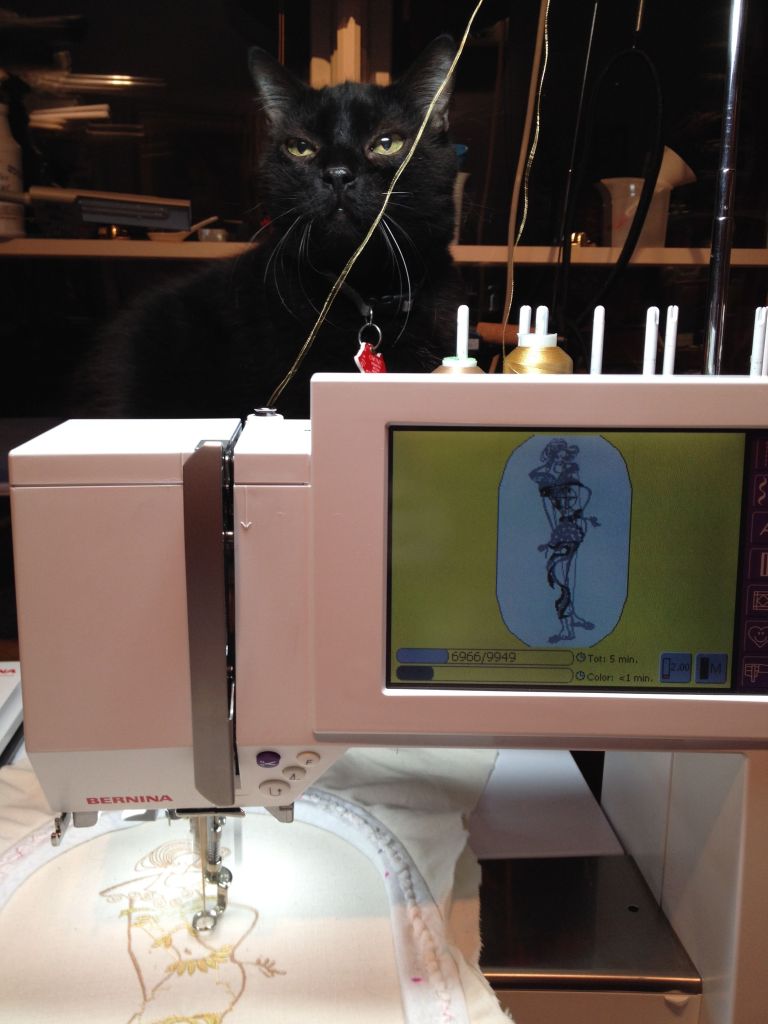 For quality control, my supervisor likes to check my thread tension.
 TIP: When doing embroidery, make sure that the threads you are not using at the moment do not lay near your flywheel (hand wheel). They can get wound up and caught in the flywheel and it is quite stressful trying to get the thread back out. Years ago I got some gold metallic thread wound up in the flywheel. Not fun!! I did get it out without any damage to the sewing machine.
After making a test embroidery of each design, including duplicates of the four extra designs using different color thread. I laid all the designs out on the floor and moved them around until I had the perfect order for the skirt. When choosing what design went where on the skirt, I took in consideration the color flow, the size of the ladies, and I didn’t want any duplicate lady next to each other.

Embroidery layout for the skirt front and back.

Front of the skirt embroidery layout.

Back of the skirt embroidery layout.
 When laying out the test embroideries, I decided to reverse the direction of one of the ladies so that she would be facing left looking towards the center front of the skirt rather than facing right. I also decided to swap two of the colors in difference parts of the design. Also look how the background fabric makes a difference on the design, to me the black linen really makes the designs pop. I like the shininess of rayon threads but I always use a trilobol polyester thread, it has a shine, not as much as the rayon, but it is washable, dryable and will not shrink, unlike the rayon thread.
I didn’t want to dry clean this skirt, I wanted to be able to wash it, so I pre washed my fabric. I washed the black linen twice using hot water and dried it in the dryer both times. After being in the dryer the second time, I took it out when it was still damp and I ironed it almost dry and laid it over some chairs to keep the cats off of it. I also pre washed and dried the cotton lawn fabric I used as my underlining and the lining fabric.
 I made the lining for the skirt first. Remember, I had already made a dress out of the “skirt” so I knew it would fit except for a few adjustments, so I used my lining to make those adjustments. I basted a zipper into the lining so that I could try it on. The only adjustments I made were at the waistline, I had to take it in so that it would fit tighter. In the picture you see where I use painters tape to mark each piece, telling me which way is the wrong side of the fabric and what the pattern piece is called. This really helps me keep the confusion factor away when sewing the pieces together.
While I had the skirt lining on I needed to decide where I would make the final hem, because this would play an important part in where I would put the embroidery designs on the linen. I only have four legged assistants and I haven’t been able to train them to mark my hems, so I use a Dritz Chalk Hem Marker to mark my hems.
 The Chalk Hem Marker has a place to put chalk in it, a hand pump that is adjustable for heights, and the chalk blows out in a straight line, marking your hem. I do not use the chalk that comes with the hemmer. I prefer to use a chalk that comes off when you iron it. That way I know the mark is gone. If you iron the chalk that comes with the hemmer you are setting the chalk into the fabric and it becomes permanent.
 This is the chalk I use. I don’t remember where I bought it but I found it here online.
If you have read my Jacket Pattern Alterations article you will see why I really needed to mark all the way around the skirt, exactly where my hem will be. Because of my bootie, I have to add to the bottom of the hem in the back and taper it down from the sides in order for my hem to be even. Here is a good example of the difference between the front and the back.

On the left is the front middle pattern piece and the one on the right is the back middle. (These pieces do not connect, there are other pieces in between where the hem will taper down.) The end of the purple fabric is the original pattern hem. The black marks are what I need as my hem. See how much more fabric I need in the back for my bootie to keep the hem even? Some people have the opposite issue, they may need more length in the front to go over a protruding tummy, or they have a flat bootie. This is why most people can’t just hem a skirt using the pattern suggested hem, you need to mark the hem while the skirt is on you.
After knowing where my hem should be, I marked it on my muslin. Now to embroider the Fashion Ladies onto my final fabric, black Italian linen. I measured the worst case length and width of each of the thirteen gore pattern pieces. I added about 3 inches for “just in case” errors, then I cut thirteen rectangles out of the linen using that measurement.
 I drew a vertical line, using iron off tailor chalk, marking the center of the fabric and a horizontal line to mark where I wanted the bottom of the fashion ladies design to end. The horizontal line is taking in consideration that I wanted the design an 1 1/4″ above my actual folded hem line, plus I needed fabric to fold up for the hem.
 On a sturdy table in my sewing room I took painters tape and made the same vertical and horizontal lines to use as placement lines when hooping the stabilizer and linen.
 I aligned the hoop to the taped markings on the table, I took painters tape and wrapped it on the bottom hoop where the alignment markings should line up.
 I placed a wash away stabilizer over the bottom hoop.
 I then carefully laid the linen over the stabilizer and bottom hoop aligning the placement lines, then secured the top hoop over the stabilized linen. I lightly pressed the chalk lines with the iron to make the chalk alignment marks disappear.
Now it was ready to embroider. My machine only has one needle, so what that means when doing embroidery is that you have to rethread your machine after you embroider each color. This is very time consuming but it is fun to watch the design form before your eyes.
 You also need to clip jump stitches, jump stitches are when the needle embroiders a section, say section A and then jumps maybe 1/4″ or 3″ away, say section B, leaving a thread from point A to point B.
 When the design is finished being embroidered, you need to take it out of the hoop and trim away some of the excess stabilizer that is on the back of the fabric. (There are times when you need a stabilizer on the top, but not this time.)
 Soak the design in warm water until the stabilizer is washed out.


I roll my embroidered fabric up in a towel to get the excess water out.
 I then press the design carefully, trying not to create any puckers.
 After pressing I hang the embroidered fabric up to let it completely dry. After it completely dries I press it one more time.
 I previously stated that I had to duplicate four of my designs to have enough designs for each gore of the skirt. This picture shows one of the designs done with two different choses of color threads. By the way, I used black bobbin thread so that if any bobbin thread should show on the front of the fabric it would just blend in with the black linen.
I like to use an underlining on most of my outfits, this is sewn as a layer under the face fabric. I show how I sew them in some of my other articles. For the feel that I wanted with the linen I used a cotton lawn, they didn’t have black so I chose a purple. They had a taupe, but it kind of changed the tone of the black linen and the purple did not. Besides I love purple, so it is like a little secret that I know when I wear it. LOL No one can see the underlining because it is covered up with the lining. Couture fashions have underlinings for several reasons, I like it because it changes the hand of the linen, helps reduce some of the wrinkles and makes the garment feel more luxurious.
 Here you see my assistant holding down the cotton lawn underlining.
 Here is a fun panoramic picture of each individual design before they are sewn into a skirt.
Now for a tricky part, cutting out each pattern piece from the embroidered linen. Things to think about, I want the design centered, on the straight grain, and 1 1/4″ from the hem fold up line. This is how I did it.

 I found the center of the design on the linen.
 I marked the hem fold up line with a pin.
I found the center of the skirt pattern by folding it in half lengthwise, making sure the grain line is straight. Each pattern piece gore is a little different.

 I placed the pattern over the embroidered linen matching the center. The ruler is still underneath marking the center of the design, so I can feel it through the pattern piece making it easy to align up the center.
 I also feel for the pin underneath marking the hem.
 I carefully removed the ruler underneath so it wouldn’t disturb the pattern placement. I pinned the pattern piece to the linen along the hem fold.
 I folded up the pattern piece and measured down to create and draw the hem cutting line with iron off chalk.
 Here is the final gore showing the cutting lines.
 It a good thing that the chalk marks will iron off.
I waited until after all the embroidered panels had their cutting lines done in chalk before actually cutting them out. This was just a precautionary step, just to make sure all the gores were going to fit on the panels properly. If one had not fit, I could have always changed the design to another pattern piece that fit better. Fortunately I didn’t have to. Everything was going as planned.
 I sewed the skirt up in sections, the whole front from side seam to side seam, and the two back sections from zipper to side seam.
 Once the front section was complete I did a decorative stitch overtop the seam down from the waist to the hem. I used a black thread so that it would create a frame effect for the design, but not take away from the design.
 A seam before the decorative stitch.
 A seam with the decorative stitch.
Trying to figure out how I was going to keep the decorative stitch covering all the seams was quite a challenge for the back zipper seam. But the decorative stitch I had picked out worked.
 I sewed the back seam up and did a basting stitch where the zipper was going to go. I sewed the decorative stitch covering the seam from waist to hem. The pin marks where the zipper was going to end.

 I carefully cut through the decorative stitch and the basting stitch where the zipper is going to go, making sure not to cut the linen.

 I hand sewed the zipper in place.
 This is the finished zipper.
 On the inside I trim away the excess seam allowance.
 Always a helper.


I did not use any interfacing and I did not put a facing at the waist. I machine stitched a grosgrain ribbon onto the the waist, folded it to the inside and tacked it down to the underlining (purple cotton lawn) using a catch stitch.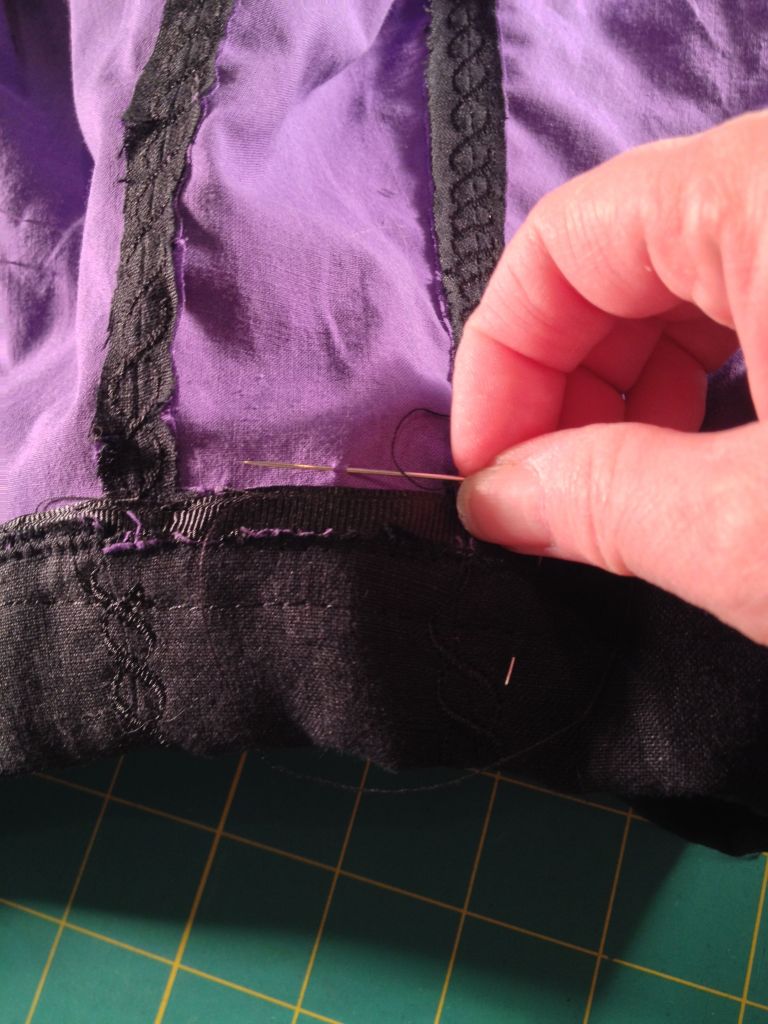 Grosgrain ribbon makes a great waistband stabilizing interfacing.
 This looks like a great place to groom myself and take a nap while she does the hem.
 This picture shows the comparison between the front hem length and the back hem length after I have sewn the hem up using a catch stitch. So remember when you make your clothes custom fit, they may not look correct when laying flat, but when they are on you, they flow over your curves.
 When attaching the lining, I started by pinning it at the waist.
After the lining was pinned at the waist I pin the lining at the hem, matching all the seam lines and making sure the lining is flat and not pulling down on the waist. When it appears to be perfect I hand sew the lining to the waist using a fell stitch.
 Before going any further I press the skirt with the lining still pinned at the hem, making sure not to press where the pin is, so it won’t make an indention. I hand sew the lining to the zipper.
 I sew the hem with the lining side up. I place pins all around the circumference of the hem about 2″ or 3″ above the bottom of the hem to keep the lining in the right place.
 I fold the lining under where it is even with the bottom of the skirt.
 I take that fold and move it up about a 1/4″ – 1/2″ and pin it. I don’t pin the whole skirt circumference at once, I just work from seam to seam. That isn’t a rule, it just psychologically works for me it creates shorter goals that are met faster.
 There again, she just has to help with all my sewing processes.
 I hand stitch the lining to the skirt and fold the lining back down towards the hem. This creates a little lip that allows movement so the lining doesn’t tear away from the skirt easily.
 The finished hem, yes I still need to take out a pin. LOL
 YaHoo! The skirt is finally finished and ready to wear! It will be great for dancing!!

 The front of the skirt.
 The back of the skirt.
Now for some close up pictures of all the Fashion Ladies.


 Fashion Ladies all around the skirt.
I have worn this skirt several times and I have washed it too. Because I have already washed and dried the fabric with heat before making it, I now can wash it in cold water and partially dry it on low heat without fear of it shrinking.
 It looks like this after it is partially dry.
 After pressing it looks like this.
I love this skirt. I feel like a doll wearing it and I always get compliments about it. I hope it inspires you to make something new and to use your embroidery machine.
 Happy Sewing!
Martina

Beautifully done!
Thank you. It was fun creating it.
Pingback: Prom Dress in Threads Magazine | TechNeats
Pingback: Fashion Show 2014 | TechNeats
Thank you for sharing your work and tips. The skirt is beautiful on you
Thank you so much!
Thank you for going step by step. I learned many new tricks
I’m glad to help, we can always learn something new. If you have any questions feel free to ask.
This is just awesome. Absolutely awesome.
Thank you so much!!
What a great job and thank you for the documentation!!
Thank you! I’m glad you enjoyed it.
Loved your skirt!! I never would have thought about covering up the seams with that type of stitching!! Interesting…I will keep it in mind for the future!! Every time I go to a sewing expo, I look for Dini Yan at her booth. The ideas she has are amazing. I have the fashion ladies CD and have to say I use it more than any others. I make gift bags for friends and almost always use the fashion ladies….. everyone loves them!!! Keep up the great work!!!!!
Thank you. The fashion ladies would make a great gift bag or tote.
Wow! What a beautiful skirt. I am so jealous. You did a marvelous job and a fantastic job of documenting each and every step. Are you a square dancer by any chance?
Thank you very much! No, I am not a square dancer but I do love to dance. The skirt would be perfect for a square dancer.
Very creative use of these pretty embroidery designs.
Thank you! I really enjoy wearing it.
Martina you are perfectionist and that is why your work is great and…. I think your helpers will get there soon.