 Boo Hoo, my grandaughter Angelica is a senior in high school. That means it is my last year to make her a prom dress; therefore, it has to be spectacular. This article is all about her prom dress I designed and made. It is full of pictures showing some of the sewing processes, the thought processes, and many couture details of the dress. I hope you enjoy the beauty of the dress as much as I enjoyed creating it.
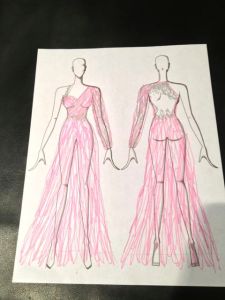
The beginning – She wanted to wear white, she wanted only one sleeve that would sparkle, she wanted it long, and she wanted a slit up one leg.
I have a design in my head, I can visualize it, it is beautiful. I can design it, I can see it, I can create it, but I can not illustrate it. It was hard to get my vision out of my head and onto paper so that I could let her see what was going to be created. I didn’t take the time to make an actual croquis (great article / video in Threads Magazine) of Angelica, so I went on line and found a free basic one and then sketched my idea on it. I did it in pink so it would show up when I texted it to her for her approval. Isn’t technology great?!! Thank goodness, she loved it.
Now that the basic design is done I have to bring this vision into fruition. During this whole 200 plus hours process my emotions ran the full gamut many times from excitement, to stressed, back to excitement and everything in-between. But ultimately I loved the whole process. I truly love the couture techniques, they are slow and take a lot of time, but they are also relaxing to me because they bring such elegance to the dress that most people don’t see, I know they are there and they make me feel wonderful. I can’t explain the feelings that I get when I wear something done with couture techniques, where everything is underlined with silk organza, the seams that are seen are french seams, seams that are not seen are tacked down so they will stay in place. And many other hand sewing details. Some day in my blog I will show how to do some of these couture techniques. I am not an expert couturier but I do love to dabble in it.
 The fabric was a challenge, it took about 3 hours of walking the store to finally get everything I wanted. The first thing I did was walk the whole store looking for something that sparkled. I wanted to know all my options so I checked out the pre made crystal motifs, the trims, the silks, the laces, non silks, everything. After looking at everything I decided on finding a “lace type fabric” that sparkled that I could cut up into different motifs. This pink fabric had it all, sparkle, a border and motifs all on a pink net. I knew the pink netting was not going to work, so I knew I had a lot of work ahead of me cutting out all the motifs from the netting.
Next I had to find white fabric. White fabric can be a challenge to match because there are so many variations of white. I finally decided on a white silky, fluid satin and a diaphanous white chiffon. (Diaphanous is a great word that I learned on the TV show The Voice, Shakira used it to describe a singer’s voice, I looked it up and it means transparent and delicate – perfect for chiffon fabric, so I love my new word. LOL).
 I now have my fabric that is extremely sparkly (none of the pictures do it justice); and, even though the sequin motifs captures the light like it is on fire, I knew she wanted more sparkle on the one sleeve, so I went to the internet and studied about crystals. I love jewelry so I know about the different types of cuts and facets, so when I was looking for crystals I looked at how they were cut and faceted. I determined that the Swarovski Crystals, Xilion Rose cut would capture the light the best and have more of a sparkle. Determining what the sizes meant was another challenge. What I chose was the flat back, hot fix, size SS34 and SS48. In meters that is 7.3mm and 11.3mm. Or in inches approximately 1/4″ and a little less than 1/2″. Even though I wanted to “sew” everything, I decided to get the hot fix crystals instead of the sew on crystals because I didn’t like the little hole in the crystal, needed for sewing it onto the fabric, to show. I was afraid it would detract from the sparkle and I didn’t want to take that chance.
 The pattern – NOT. There was not a pattern that even remotely resembled this dress and I didn’t want to try to draft one. Even though I like the drafting process, sometimes I think it is easier to just modify an existing pattern than to draft my own.
I looked through all my patterns, old and new, and I chose three. I thought I could take different pattern pieces from each, modify them and put them all together. I used a modified corset from Simplicity 1910, a modified skirt from Vogue V8494 (out of print) and an extremely modified bodice and sleeve from Butterick 5746 (out of print).
By the way, in my blogs if you see something typed in pink, it is a link to another site. Just click it to go to that website. Most of my pictures can be blown up. I might put a small picture in the article, but if you want to see larger details, just click the picture and it will take you to a larger photograph.
Now, back to the dress.
 I modified the front and the back of the corset. The front was cut shorter to the waist, and the top was curved in at the center top to show a little bit of cleavage. I don’t have a picture of this but you will see it on the first fitting picture. This picture is the back of the corset which was modified by cutting it off at the bottom to have it stop at the waist and by opening up the back by curving it down towards the waist. As you can see this piece is made up using three pieces, because I was only going to the waist and not curving out to the hip I was able to take out the two extra seams and make it one pattern piece. The black lines are the new seam lines. When I was making the muslin for the back here, I knew I wasn’t going to use the top part of the back so I didn’t even cut out the full length at the top back, that is why it looks like a stair step at the top. The original pattern also had a side zipper, but I had to put in a back zipper because I was sewing in a store bought long line bra that closed in the back, and I didn’t want to modify the bra.
The corset top was made using the silky satin, silk organza underlining, and the silky satin again for the lining. The right side of the bodice was then covered in chiffon, sequins motifs and crystals. No boning was used because of the bra I sewed into it. By sewing in the long line bra it put all the weight of the dress onto the waist, and kept the top supported so it couldn’t fall down; therefore, she could dance and not have to keep tugging at her top.
 I modified the skirt by adding a slit to the front at the center of one leg. I then changed where all the seams were. I made the slit into a seam, took out the side seams and kept the back seam. This picture was taken before I took out the side seams, but you can see where I added the slit.
The outer bodice was made out of layers of silk organza and chiffon. The back was the silk organza only. White silk organza, at least the one I bought, is not a true white, but since the back was going to be mostly covered in the pink sequin motifs it didn’t matter. I wanted to use the organza only because I knew the sequin motifs would be heavy and I needed the sturdiness of the organza.
 I modified the outer bodice a lot. The tissue pattern in this picture shows that the bodice should be cut on a fold. The white muslin is placed on top of the pattern piece matching the center fold on the tissue pattern piece. This shows how the new pattern (white muslin) has a smaller shoulder seam width, and the front is cut on a diagonal that creates a faux wrap front. I don’t use this pattern on the right side of the dress bodice (her right side, on the left in the picture) because I am using the corset as my right side bodice.
 This is the bodice back, in this picture you can see how I modified the original pattern. The left arm has a sleeve, the right side does not have a sleeve, the back is curved in and the shoulder width is just big enough to attach a rhinestone strap. The black line in the center is going to be cut out. She has a tattoo in the center of her upper back that needed to be covered up, so I actually waited until the dress was almost finished before I cut it out. I put the almost finished dress on her and hand basted where it needed to be cut.
 This is a picture of the sequin netting / lace. As you can see it has a beautiful border and flower motifs all sewn on and surrounded by pink netting. I cut around all the flower motifs making sure to get most of the pink netting. You have to keep some of the netting for support.
 On the border you can see that some of the motifs go into the curved border, I did not want these flowers there, so I needed to cut them off.
 To be on the safe side I took some glue and put it on the wrong side of the fabric only where I was going to cut through the sequined flowers. I thought by putting the glue there it would be a safeguard so I wouldn’t loose any valuable sequins. After doing this, I really don’t think I needed to do it with this particular fabric because of the way the sequins were sewn onto the netting at the factory. But other fabrics I have used before were not of this quality and they needed some support, glue or hand sewing to keep the sequins in place.

 These pictures are showing the flower motifs before and after the netting was cut off.
A little netting is kept in the center between some of the flowers and on the inside of the curves of the little curly q’s. I left them for support especially on the curly q’s because when the netting was cut they were real flimsy.
Fitting – I always make a muslin first of anything I make, that way I can make all my alterations in the muslin for proper fit or make any style changes I want. I also might decide that I don’t like the way it looks on me after all and I decide not to make it. That way I haven’t wasted my good fabric on something that I wouldn’t be satisfied with.
Angelica wanted a white dress so I made the muslin out of white cotton, that way she could get an idea what the actual dress would look like. During the fitting I would use different colored Sharpies (pens) and pins to make any adjustments needed. 
This is the front view of her first fitting. This is where you can see where I started the modification of the corset top I mentioned earlier in the article. In this picture I have made a slit down the center front of the corset. This will be just above where I want the curve to start for the bodice top.

This is the back view before the outer bodice is added. You can see how I brought the back bodice curve down low instead of straight across at the shoulder blades like the original pattern called for.
 This view shows the top bodice added to the corset. I also pinned the border around her waist and other sequin motifs on the muslin to give her an idea of what it will look like.
 Back view with sequin motifs pinned on to give a preview of what it might look like. As you can see you still need a lot of imagination.
 Memories of our fitting.
We have had our first fitting, things are looking good, but now I want some fun excitement so I decide to abandon the dress part and work on the artistic sleeve. I’m really excited now because the embellishing is what I LOVE to do. I love to make things look pretty, especially with sparkles. LOL
We want the sleeve a little transparent between all the the sparkles, so I make the sleeve using one layer of silk organza with a layer of the white chiffon over top. I want the sleeve flat while I do all the embellishment so I don’t sew the sleeve together, but I do baste the two layers together all the way around all edges, and I put in the elbow dart. When it is all embellished I then sew it together using french seams.
 This first picture is me playing around with the sleeve pattern placing the border and motifs in different places. I only have so much of the border and I need some for the waist. I measure off what border is needed for the waist (plus some to spare) and take the rest to use for the sleeve. I don’t want to cut into the border until I know exactly what design I am going to do, so as I am playing I place the border on, place pins where the seam would be, then I take that piece using the pins as markers and move it to other sections. It was quite a challenge, here goes the emotions – excitement, to stress, to fear, and back to excitement. With me that is all part of the process. LOL

When I play around with my embellishments, I take pictures of them so I can compare what I like and don’t like. Then I can refer to the picture of the one I like and recreate it. Although sometimes I still change it a little. That’s a woman’s prerogative. LOL
 Here is the final sleeve with crystals added, hemmed and sewn together with french seams
 I wanted the seam to be partially covered with the embellishments too. I didn’t want to completely cover it because then it would have created a line of embellishments and I wanted the white to show through to kind of create a breathable airy feeling or pause in the design. For interest creative designs need light and dark, so in this case the pink is dark and the white is light.
 When I sew with lace or motifs, I first pin them on where I think they should go, then I add other motifs. Where the flowers or designs collide, or over lap, I determine which of the two little flowers, that over lapped, pieces look better, then I grit my teeth and carefully cut off the other one. (stress, fear, excitement)
 Depending on where the motif is located I hand sewed it on from the backside using white thread, or
  hand sewed it on from the front side with a pink thread that would blend in with the sequins, catching the top and underlining but not catching the lining so the pink thread won’t show on the inside of the garment.
Using the sequin border at the waist was another challenge. I didn’t want any seams except at the back zipper. So when I placed the border in the front it had to be high enough to blend in with the right side bodice embellishments and make sure that it covered the waist seam. In the back I wanted it to dip down a little so that it would kind of come to a point at the zipper. Then I wanted it to match where the borders came together for the zipper. It was impossible to make it match completely at the zipper (without having any seams) so I wanted to give the effect that it matched by matching the top curved line and the bottom curved line. Very, very stressful. I actually started to have a panic attack as I was cutting it, because one wrong snip and it would be totally ruined. I just kept calming myself down by comparing this sewing to the time I was on the steep roof of our mountain house trying to fix a leak. I just kept saying to myself, if I can get on a steep roof on top of a mountain I can certainly sew this border at the zipper. I finally got it done. I was so excited!!! But I had to sit down to calm myself completely. The things we put ourselves through for fashion…
 Playing with the waist border and embellishments.
 The back border.
 The final waist border at the zipper. The zipper was hand sewn. I have hand picked zippers before, but this was the first time that I actually hand sewed in an invisible zipper.
For the right side front I made a rhinestone strap. I first made a strap out of the silk organza with the seam on the top of the strap in the center. That way no seam would show because I was going to hand sew the rhinestone on top of the seam side.
 I bought a rhinestone trim, but I wanted to add pink rhinestones to it, that way it would pull the color theme together. I hand sewed the rhinestone trim on with silver thread so that it would blend in with the rhinestones.
 The backside of the strap.
 The final strap. Haute Couture is all about the little details.
Now for the back cut out. As I mentioned before I had her put the dress on after it had the zipper in and the strap attached, so that I could find the exact place to cut the hole out. After cutting the hole I did a small binding all around the hole. I wanted the edge of the cut out to lay flat against her back. So many times I see cutouts and they are gapping away from the back. I didn’t want that and since I knew I was going to be covering the back with embellishments I thought, why not run a small cord of elastic through the binding. Pulling it slightly it would make the cutout lay flat, plus with it being elastic it would give a little when she moved around and danced. It worked great.
 The binding.
 The elastic cording in the binding.
 Side view showing no gaps, except where I am going to put a hook and thread bar (eye) at the zipper and covered snaps on the top section. And remember the back is going to be covered in embellishments so the little wrinkles won’t show, plus it needs a good pressing.
Pictures to follow of the final back.
Angelica was going to wear 5″ or 6″ heels with the dress and she could barely walk in them, much less dance in them so she told me she was going to take them off to dance. All I could think about was all this time and hard work spent on making this dress and having someone with their spiked heel step on the chiffon and ripping a hole in it. I had to come up with something. I wanted it to be white so it would blend into the hem and something heavy to take the stress of someones spiked heel. I had to have the dress done the next night, I didn’t have time to go into Atlanta to find some lace so I looked through my stash and I found these heavy lace appliqués. They were going to have to work. So I hand sewed them all around the bottom of the hem. They actually added a nice touch, especially when she took her shoes off, because the lace puddled around her feet on the ground, which was quite pretty.
 The lace hem.
 My assistant helping me with the hem.
The dress is finished!!!!! Following are pictures of Angelica in the dress and some closeups of the details. I hope you enjoy them.
Feel free to comment or ask questions at the end of the article.
 Front
Front
 Bodice Details
 Back
Back
 Couture Fabric Covered Snaps
 Hook and Bar Tack
 Back Details
 Back Zipper
 Sleeve
 Sleeve Seam
 Assistant AGAIN


 Angelica
 Us
Us
Thank you for sharing my journey of this one of a kind Prom dress.
Sewing is my passion and I love being able to share it with others like you.

That’s past beautiful reminds me of details on old Hollywood gowns….can’t wait for the wedding dress that only you could make with love. This is made for memories and little girls learning from great grandma. …how you made her dress as you teach her the finer ways of dress making….
Thank you so much!
Pingback: Prom Dress in Threads Magazine | TechNeats
Pingback: Fashion Show 2014 | TechNeats
Your dress is beautiful too – did you make that one also?
Thank you but No, I bought it at Macy’s.
Awesome blog! Loving it!
Thank you. I’m glad you enjoyed it.
Like I told you earlier, this dress is absolutely beautiful and now that I’ve read your post, I’m in awe. You did a FANTASTIC job on this creation. Oh the details and they surely paid off. I’d also like to thank you for sharing your process with us. Now I feel like I can create some of these details in a special dress one day. GREAT job, Martina. I LOVE IT!
Thank you so much. I know you can create something special too!!
Martina what a work of art, I know your many talents, patience and love for sewing and perfection, congratulations.
Nancy
Thank you!
The dress and your granddaughter is simply beautiful!! What great memories to give her! You are extremely talented!! Thank you for taking us with you on this beautiful journey.
I’m glad you enjoyed it. Thank you very much.
Martina,
Your dress takes my breath away. It is absolutely beautiful and so well thought out and executed. I know every girl at the prom was green with envy over her dress. Your eye for design and attention to detail are so obvious in your work of art.
India
Thank you!
Truly a labor of love! Amazing!
Thank you Debbie!
Wow, you’re a creative genius! I loved the dress before I knew all this went into it, now I’m just in awe. So many wonderful and practical techniques, like glueing sequin backs before trimming. The elastic around the cut out was genius. I’ve always stayed away from cut outs because they are so gapey, but you nailed it. The crystals, the beading, the sequins seriously transformed this dress into a gown fit for a princess. So well thought out, so well executed. I’m in awe. Thank you for sharing your step by step , wow!!
Thank you Jeannine.
Martina,
Your granddaughter’s prom dress is indeed a one of a kind. So exquisite, and beautiful as are you and your granddaughter. I admire your imagination, inspiration and couture talents. Thank you so much for sharing this unique dress and all of your painstaking steps to accomplish such a lovely gown.
Sheri
Thank you so much Sheri, I truly love to sew beautiful things.